

Portable lighting transforms pet photography, giving you control over light in any setting. Whether you're working indoors, outdoors, or in challenging conditions, the right tools and techniques can elevate your pet portraits. Here's what you need to know:
- Lighting Types: Speedlights for portability, continuous LED lights for real-time adjustments, and battery-powered monolights for high power.
- Modifiers: Umbrellas and softboxes shape and soften light, enhancing details like fur texture.
- Accessories: Wireless triggers eliminate cables, reflectors balance shadows, and reliable batteries ensure uninterrupted sessions.
- Techniques: Start with single-light setups for simplicity, then progress to multi-light setups for more depth and control.
- Pet Comfort: Use continuous lights for skittish pets and minimize distractions with a calm environment.
Portable lighting allows you to work beyond natural light limitations, ensuring sharp, well-lit images every time. Keep your gear organized, practice setups, and combine technical skills with patience to capture stunning pet portraits.
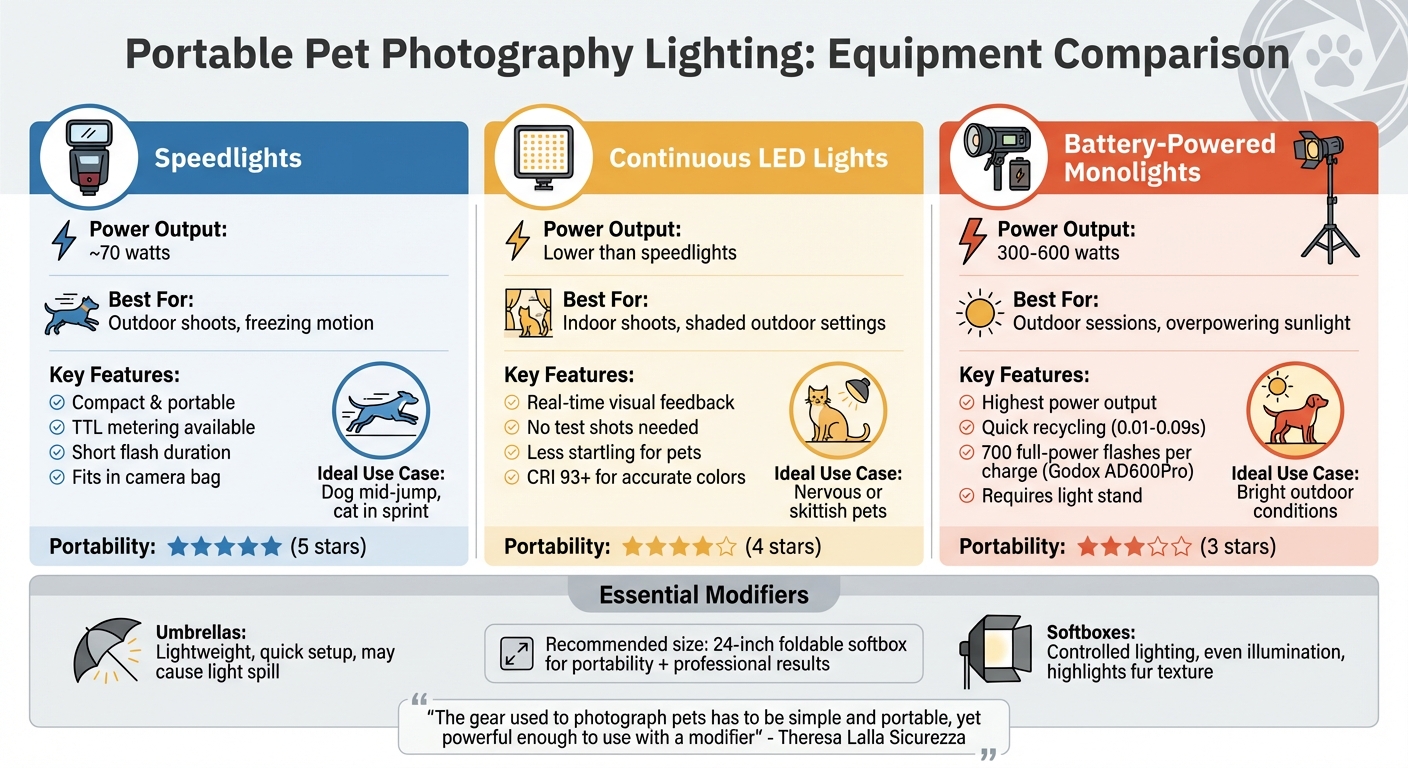
Types of Portable Lighting for Pet Photography
Portable Pet Photography Lighting Types Comparison Chart
The right portable lighting can make or break your pet photography session. Your choice will depend on the location and the type of shots you're aiming for.
Speedlights are compact, battery-powered flashes that fit snugly in your camera bag, making them perfect for outdoor shoots. With an average output of about 70 watts, they’re powerful enough for most pet portraits. Their short flash duration is a game-changer for freezing motion - whether it’s a dog mid-jump or a cat in full sprint. Many models feature TTL (Through The Lens) metering, which automatically adjusts flash power, saving you precious time during fast-paced sessions.
Continuous LED lights are another great option, offering real-time visual feedback as shadows and highlights shift. This eliminates the guesswork and allows you to skip test shots.
LEDs are also less startling for pets, as they don’t emit sudden bursts of light. High-quality LED panels with a Color Rendering Index (CRI) of 93 or higher ensure accurate colors . However, because portable LEDs are less powerful, they’re best suited for indoor shoots or shaded outdoor settings.
Battery-powered monolights take things up a notch, delivering between 300 and 600 watts of power. These are strong enough to overpower sunlight, making them ideal for outdoor sessions. For example, the Godox AD600Pro offers quick recycling times (0.01 to 0.09 seconds) and can fire up to 700 full-power flashes on a single charge. Keep in mind, though, that these lights require a light stand for proper setup.
Modifiers like umbrellas and softboxes are essential for shaping and softening your light. Umbrellas are lightweight and quick to set up, though they can cause light spill in tight spaces. Softboxes, on the other hand, provide more control and deliver even lighting - perfect for highlighting the intricate details of a pet’s fur. A 24-inch foldable softbox strikes a balance between portability and professional-quality results.
For beginners, simplicity is key. Theresa Lalla Sicurezza, a professional pet photographer, puts it this way:
The gear used to photograph pets has to be simple and portable, yet powerful enough to use with a modifier at a smaller aperture for adequate depth of field.
Starting with a single speedlight paired with a small softbox or umbrella can help you achieve professional-looking results without overwhelming yourself - or your furry subject. These lighting tools provide a solid foundation for creating stunning pet portraits while keeping things manageable.
sbb-itb-c3a5f9c
Accessories for Portable Lighting Setups
Elevate your portable lighting kit with accessories designed to handle the unpredictable nature of pet photography. These tools can turn a simple setup into a flexible system that helps you focus on capturing those fleeting, perfect moments.
Wireless Triggers and Receivers
Wireless triggers are a game-changer for pet photography, eliminating distracting cables that can trip up both you and your furry subjects. Unlike infrared systems, radio triggers operate without needing a direct line of sight, allowing you to position lights behind obstacles. They also boast impressive range - typically between 300 and 1,600 feet - compared to the 32.8-foot limit of optical systems outdoors.
Advanced transmitters go even further, letting you adjust flash power and control light groups directly from your camera. Photographer Hillary Grigonis highlights their value:
A remote flash trigger opens up studio lighting possibilities for on-location photography.
This means less back-and-forth to your light stand, keeping pets engaged and reducing distractions. If you're on a budget, options like the Yongnuo RF-603CII offer solid performance. For more advanced features like TTL metering and high-speed sync, brands like PocketWizard and Phottix are excellent choices. To avoid misfires, always use fresh batteries in your transmitters and receivers. These wireless systems pair seamlessly with other tools to fine-tune your lighting setup.
Reflectors and DIY Options
Reflectors are another must-have for improving light quality. They bounce light into shadowed areas, such as under a pet's chin or along the darker side of their face, creating soft, natural catchlights that add life to their eyes. Unlike flashes, reflectors provide continuous and silent light, which is ideal for pets that might be startled by sudden bursts. As photographer Amiee Stubbs puts it:
A reflector is the perfect tool to control the light in what can be a constantly changing scene. I don't like to see flash catch lights reflected in an animal's eyes, and some pets can be fearful when a flash fires.
For a warmer effect, the "Soft Gold" side of a reflector helps balance out the blue tones often seen in black fur. If you're looking for a low-cost alternative, try wrapping colorful cellophane around an LED light to create custom effects. Basic portable LED panels are also affordable, starting at just $20, making them a great option for beginners. Of course, none of these tools will work without reliable power, which brings us to the next essential accessory.
Batteries and Power Solutions
A steady power source is critical for keeping up with the high energy of pet photography. Rechargeable Panasonic Eneloop AA batteries are a favorite for speedlights, offering both affordability and the ability to handle multiple sessions. For faster flash recycle times, external battery packs like the Canon CP-E4 are a solid investment. They ensure your flash is ready for rapid shots - perfect for capturing a dog mid-jump or a cat mid-pounce.
For continuous lighting setups, V-mount batteries like the Neewer PS099E are a reliable choice. With 99Wh of power at 14.5V, they can keep a 60W LED panel running throughout an outdoor shoot. These batteries have received top ratings from users, with a perfect 5.0 out of 5.0 score. To stay organized, stash spare batteries for your flashes and triggers in a zippered cosmetic bag. It’s a simple way to keep small essentials handy and avoid interruptions during a session.
How to Use Portable Lighting in Pet Photography
Single-Light Setups for Pets
Starting with a single light source is a great way to keep things simple and avoid overwhelming your furry subject. This setup reduces distractions, allowing you to capture the perfect shot before your pet loses interest. For soft, flattering light, use a large modifier like a 35-inch or 46-inch umbrella. Position it directly above or slightly on-axis with your camera to create a gentle, painterly effect that lights up the pet’s face and softly spills into the background.
Place your main light 3 to 8 feet away to create catchlights in the pet’s eyes. For pets with darker fur, adding a rim light behind them - using a strip box with a grid - can subtly outline their form and add depth.
To avoid tiring your pet with multiple test shots, use a stand-in, like a stuffed animal, to fine-tune your lighting and camera settings. If your subject is skittish or nervous, consider swapping flash for constant LED panels. Mike Harris, How To Editor at Digital Camera World, advises:
Some pet photographers use flash to capture four-legged friends, but both the flash and recycling hiss can make some animals uncomfortable – so if you have a nervous pet, I'd recommend using constant lighting.
Be cautious with side lighting, as it can cast heavy shadows on a dog’s nose, creating an overly dramatic effect. A reflector can help fill in those shadows without startling the pet. Stick to a shutter speed of at least 1/100 s and use single-point or Animal Eye AF to keep the nearest eye sharp.
When you’re ready to take your creativity further, multi-light setups can offer more control and depth.
Multi-Light Setups for Advanced Shoots
Building on the basics, multi-light setups let you refine your lighting for professional-level results. Typically involving two to three lights, this approach allows for better control over shadows, background separation, and overall polish. Start with one light as the key light to illuminate the pet’s face. Use a second light as a fill to soften shadows, and a third as a rim or hair light positioned behind the subject to highlight finer details. This setup works particularly well in outdoor settings, where sunlight can act as a natural backlight while portable lights handle the key and fill roles.
When mixing flash with natural light, shooting in full manual mode helps maintain consistent exposure across shots. For backlit outdoor scenes, use your portable light to fill in the pet’s front, preventing them from fading into shadow. Indoors, set up next to a window on an overcast day for soft, natural light that can be supplemented with portable LED panels. This approach ensures smooth transitions between indoor and outdoor shoots.
Position the pet a few meters away from the backdrop to avoid washing out the background. For pets with light-colored fur, slightly underexpose your shots to preserve detail. For long-haired animals, placing a light source below their head and body can create a dramatic effect that accentuates texture.
If you’re using LED lights, make sure they’re placed at a safe distance or opt for cool-running models to avoid overheating. For smaller pets, elevate them on a couch or chaise lounge raised on crates. This keeps them at eye level while slightly limiting their mobility, making it easier to maintain consistent lighting. Using a wheeled, low-profile chair can also help you stay at eye level while tracking the pet’s movements, ensuring the light hits their features just right.
Lighting for Luxury Pet Accessories
Building on portable lighting basics, advanced methods help highlight textures and shadows, adding depth and elegance to luxury pet accessories.
Bringing Out Texture and Detail
Photographing high-end pet accessories, like those from Susan Lanci Designs, requires lighting that showcases their craftsmanship. Side lighting works wonders for emphasizing the intricate texture of materials such as Ultrasuede® fabric. Position a portable LED light at a 45-degree angle or lower to the side of the accessory. This setup creates gentle shadows that highlight the fabric's weave, stitching, and embellishments, giving the product a rich, dimensional look.
For items adorned with Swarovski crystals, a large softbox is ideal. It softens harsh reflections, preventing glare that could obscure the sparkle of the crystals. Low-angle side lighting also enhances the three-dimensional quality of these luxury materials.
To make textures pop even more, apply the short lighting technique. Place the strongest light on the side of the product that's less visible in the frame. This approach deepens shadows, accentuating every detail. For darker items, such as black Ultrasuede® beds, increase the light intensity or add a second light source to avoid a flat, silhouetted appearance.
This focus on texture naturally ties into the importance of shadow control in product photography.
Controlling Shadows in Product Photography
Precise shadow management ensures textures stand out while maintaining a clean, professional look. A three-point lighting setup is a go-to method for achieving this balance. Start with a key light for the main illumination, add a fill light at a lower intensity to soften shadows, and use a rim light behind the product to create a bright outline that separates it from the background. This separation is especially important when the product's color closely matches the backdrop.
Continuous LED lighting simplifies shadow control by letting you see the final result in real-time. This "What You See Is What You Get" approach allows for on-the-spot adjustments to brightness and color temperature, ensuring key details are highlighted. LEDs also run cool, which is perfect for protecting delicate materials and keeping any pet models comfortable during the shoot.
For subtle shadow adjustments, use a white foam board to bounce light into darker areas. Place it opposite your key light to gently fill in shadows, making fine details more visible. For darker materials, switch to the reflective tin foil side of a reflector to create a brighter, sharper light that defines the product's shape. This technique adds depth and ensures the accessory's features are clearly visible.
Packing and Transporting Your Lighting Gear
Once you've mastered your lighting techniques, the next step is ensuring your gear is packed and protected, ready for any shoot. Portable lighting gives you flexibility, but smart packing keeps your equipment safe and accessible for dynamic pet photography sessions. Here are some tips on essential items to pack and how to prepare for unpredictable weather while maintaining a professional setup.
What to Pack in Your Camera Bag
A dual-bag system works wonders - use one bag for cameras and lighting gear, and another for pet-related items like treats, toys, or wet towels. This separation minimizes the risk of accidental damage to your delicate electronics.
"I recommend using a lightweight zippered women's cosmetic bag to hold, and organize, your smaller items such as remote triggers, batteries, front and rear caps, etc. This is the easiest way to keep those items contained in one spot for easy access."
- Suzi Pratt, Photographer
Opt for a camera backpack with padded, removable dividers to keep your equipment secure during transit. A bag like the Lowel Litebag lets you customize the interior layout to fit your lighting kit while staying compact. Keep essentials like remote triggers, spare batteries, and lens caps in a smaller, organized pouch within your bag for quick access during shoots.
Don’t forget the power essentials: pack reliable rechargeable batteries, a car charger, and spare SD cards. These are the items most likely to run out during a busy pet session. If you’re working with heavier outdoor strobes like the Godox AD600Pro, consider modifying a golf pull-cart with all-terrain wheels to transport your gear smoothly over uneven ground.
Setup Tips and Weather Protection
A well-organized setup and preparation for weather changes allow you to stay focused on getting the perfect shot. Always use a waterproof camera bag or carry a rain hood to shield your electronics from unexpected rain or splashes.
"Camera equipment is heavy! And if, like me, you have a sensitive back that gets sore easily, I recommend trying a supportive camera bag."
For outdoor shoots, secure your light stands with sandbags or weights, especially on uneven or windy terrain. Lightweight options like the Manfrotto 5001B Nano stand (just 2.2 pounds and folds down to 19 inches) are easy to carry but require proper weighting to stay stable. Keep microfiber towels or blankets on hand to dry off your gear - or your furry subjects - between shots.
Conclusion
Portable lighting transforms pet photography from a game of chance into a craft you can control and refine. Whether you're using a single speedlight or a more complex multi-light setup, mastering light allows you to shape texture, enhance detail, and set the mood - regardless of the environment. As professional photographer Peter Dam explains:
Using professional studio lighting ensures you achieve a consistent look and quality across different outdoor shoots, which is crucial for professional work.
The techniques in this guide - ranging from simple one-light setups to more advanced methods for photographing dark-furred pets - are all grounded in one key idea: understanding light is the foundation of great photography. Start small with a single light to learn how positioning and modifiers influence your results. Experiment with your settings before stepping into a shoot.
Of course, technical skills alone won’t guarantee success. As Mike Harris from Digital Camera World points out:
The hardest thing about photographing pet portraits is the pets themselves. Patience and positive reinforcement are key.
Pair your lighting expertise with treats, toys, and a calm demeanor to create a fun and relaxed atmosphere for your furry subjects. This combination of technical know-how and thoughtful interaction ensures a better experience for both you and the pets.
Portable lighting also frees you from the constraints of natural light. Instead of being limited by the time of day or weather, you can select locations purely for their aesthetic appeal. Early mornings, golden hour, or even shaded settings become opportunities rather than challenges. With practice, you’ll gain the confidence to capture those perfect catchlights in your subject’s eyes - the small details that make portraits truly shine.
Keep it simple at first, practice regularly, and watch as your work evolves from casual snapshots into polished, professional-quality portraits.
FAQs
Should I choose flash or LED for my pet?
When it comes to pet photography, both flash and LED lighting offer unique benefits. Flash delivers strong, motion-freezing light, making it ideal for capturing sharp images of energetic pets. On the other hand, LED lighting offers a continuous and adjustable light source, creating a softer effect that’s often less stressful for animals. If you’re aiming for polished, studio-style photos, flash is the way to go. For a more natural vibe and the ability to tweak lighting in real time, LED is your best bet. Ultimately, the right choice depends on your setup, your goals, and, most importantly, your pet’s comfort.
What’s the easiest one-light setup to start with?
When it comes to pet photography, one of the simplest lighting setups involves using a softbox or an umbrella modifier with a portable light source. This combination creates soft, flattering light that’s easy to manage, whether you’re shooting indoors or outdoors.
To get started, position the light at a 45-degree angle to your pet. Adjust the height and distance to achieve the desired softness. If possible, incorporate natural light to maintain a consistent and balanced look.
How do I light black or white fur without losing detail?
To capture detailed photos of black or white fur, managing lighting is key. Avoid overexposing white fur or underexposing black fur by carefully controlling the light. For white fur, minimize light spill and use tools like V-flats to reduce reflections that can wash out details. When photographing black fur, slightly underexpose the shot and use RAW format to recover shadow details during post-processing. Opt for soft, diffused lighting - whether natural or from a softbox - to evenly illuminate the fur, avoiding harsh shadows or distracting shiny spots.